Sunday, December 15, 2013

Preparing Stems from Ableton - tips and ideas

As I'm going through the Art of the Remix class I'm thinking about ways I can use some of these ideas on other projects, not necessarily remixes.   In this case I've got some songs that I made with a buddy of mine at Wombat Recording, and they are all using Ableton Live rewired to Reason.   This is from back when I was still figuring out Ableton, and we actually started the project with just Reason being a standalone virtual synth, recording this and everything else into ProTools.  So how can remix techniques help, and specifically, how do stems help?
  • I can send my parnter stems that can be loaded into ProTools and mixed there.  This is good because it allows us to share the work of mixing and to get different perspectives on the mix.
  • I'm using Reason less and less these days, and I'd like to be able to load up some of these songs into Ableton without doing all kinds of ReWire stuff.
  • Maybe I want to try mixing with a different system, such as REAPER. 
  • Playing back stems uses much less CPU than running the Reason engine.   Stems will allow a more elaborate mix set up on a given machine.
Sounds good.   So, what's the best way to go about it?  Exporting stems from Ableton Live is really easy, but there is some preparation that can make the mix workflow much faster.

Here are the steps that I used to prepare these Live->Reason songs for making stems:
  1. Save As...  Since I might want to re-load the original mix at some point, it makes sense to save a separate copy of the set.  Save every step of the way.
  2. Check sample rates - make sure the audio clips are at the same sample rate.   Use this standard sample rate for the export later.  Optionally, set the audio interface to use this sample rate.
    If the sample isn't the right rate, I click 'Edit' and use WaveLab/CrystalResampler to convert.  Switch back to Live, it reloads the file and sees the new sample rate.  (Maybe someone out there knows of a better way to do this?)
  3. Separate ReWire Channels for each instrument - This is a bit of a pain, but otherwise you'll end up with stems that have pre-mixed stuff in them.   You can right click on the outputs of a given device, mouse over Hardware Interface and choose some available channels.
    Then in Live, create an audio track. Audio From should be set to Reason and the channel pair should be selected. Monitor should be set to In.  I find it best to take the output before any compressors or eqs.   Distortions (e.g. Scream) and things like that should probably stay.
    Again, this can be pretty tedious but if someone out there knows of a way to automate it, don't hesitate to point it out. :) 
  4. Name all the tracks.   Nothing is worse then having a bunch of 'audio 1', 'audio 2' file names.
  5. Ungroup everything in Ableton.   Delete any 'sub-mix' channels (the other way of doing grouping).   Optionally delete return tracks, except maybe 'side chain' returns.
  6. De-activate channel effects like static EQs and compressors.
  7. Delete all mix automation.  I look for the red indicators in Session View and right click -> delete automation on those.
  8. Play the track back and set the main faders of each track so there is some headroom.   Check the peak indicators.   If they say -20db you can probably bump it up some.   If they are at -3, then that's fine.
  9.  Now the Set should be ready to render as 'raw' stems.   Make sure there is no time selection in the Arrange view, and choose File->Export Audio/Video.   In the Rendered Track menu, select 'Individual Tracks'.   Make sure the sample rate is the one that all the clips were converted to.  If you are rendering with a lower bit depth, (e.g. 24 bit audio clips and rendering as 16 bit), you may want to select a dither option.
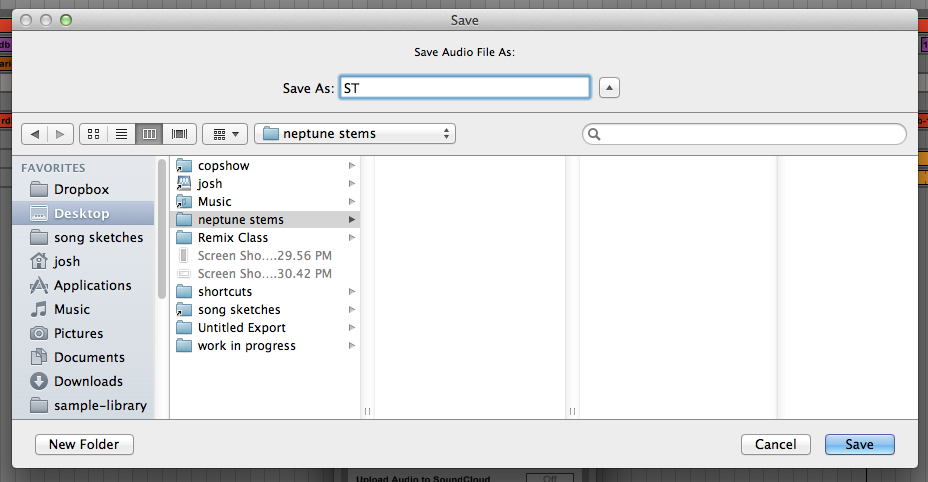
Here's an example where I rendered stems into a 'stems' sub-folder in my Ableton Live project, and chose 'S_' as the name, so that the file names would be short.   The stem files are all the same length, and have the track name as a suffix.


Monday, December 9, 2013

Monomachine THRU Machine Tips

A few tips regarding using the Monomachine's inputs with THRU machines.

Creating a THRU Machine

Nothing too exciting here.   Just select the THRU machine in the menu and select the inputs that you want it to pass through.

While you're in the Kit Edit menus, might as well turn off keyboard tracking for the HPF and LPF (see below for more on this).

Not hearing the inputs

The THRU machine has an AMP envelope, just like all the other machines.   To hear the inputs:
  1. Place a trig on beat one.
  2. Turn HOLD, DEC, and REL all the way up.

If the inputs sound 'tinny'...


This is because the HPF/LPF keyboard tracking is on by default.   The note trigs will automatically affect the filter, especially the HPF (base).   The higher the note, the more severe the HPF will be.

To fix this: Go to Kit->Assign, select the KEY tab.   TURN OFF HPF AND LPF KEY TRACKING!

Wednesday, November 27, 2013

Octatrack - stereo inputs with thru machines

I was spending a few hours making a new track for another 'live jam' video today, with the Octatrack/Monomachine/Tempest setup.    At some point I was programming the Tempest and I was adjusting some panning, but I couldn't hear the changes.   I listened to the headphone out of the Tempest and... there it was, in stereo.   Hmm.   What could this be?

Turns out to be a simple mistake.   Thru machines on the Octatrack need to be configured correctly:

"A B"(Note the space between A and B) Stereo pair AB.  
This is usually what you want.
"A"A only, mono.
"B"B only, mono.
"A+B"A and B, summed to mono!


So yeah, I had the inputs set to "A+B", which summed everything to mono!   Switching to "A B" and "C D" for the second thru machine fixed it.

Saturday, November 23, 2013

Mixing Stems from Ableton with REAPER

Recently I decided to try mixing some of the older material from 'Copsho' in REAPER, using stems generated from Ableton Live.   Here are some notes on how that process went.

Exporting stems from Ableton Live

First, I should say that I'm using Ableton Live 9.1, which just came out.

This is the easy part.   To get the highest quality, I made sure the samples in the project were all of the same sample rate.   Maybe there is an easier way to do this, but I just click on the samples and look at the clip view.

To export stems from Live:
  1. File -> Export Audio/Video ... (or command-shift R)
    • Rendered Track: Individual Tracks (this is what makes Live export stems)
    • Make sure the file type, sample rate, bit depth are set to be the same as all the audio clips.
  2. Click Export
  3. Make a new folder in the save dialog, and select it.
  4. Enter a name.  This will be used as a prefix for all the resulting file names.  Since you have a folder created in the previous step, chose a short name.
  5. Click Save.  Live will now generate stems for all tracks.   Returns, groups, everything.
Remember the following for the import into REAPER:
  • Sample rate, bit depth
  • Song tempo

Dropping the stems into REAPER

 You can pretty much just drop the stems into REAPER.    However, there are a few setup steps that will make life easier:
  1. Launch REAPER, create a new project.
  2. Set the tempo of the new project to the tempo of the Live set: File->Project Settings...
    • In the Project Settings tab, set the Project BPM. 
  3. Save the project, check Create subdirectory for project so you have a place to put the stem files.
  4. For convenience, move (or copy) all the stem files into the new project folder.
Now you can drag and drop the stem files into the REAPER project.

When REAPER asks, select Separate Tracks.

That's pretty much it.   Now you should have a self contained REAPER project folder with all the stems in it.